Lolita Makeup Tutorial: Laziest Halloween Nail Art.

Although this year’s Halloween has already passed, I think it is still necessary for us to learn this nail art tutorial coze it is really amazing and you can wear this nail makeup in your daily lives.

OK, let get started.

Materials that you will need >>>

1

Step 1: Make a diagonal stripe.

2

Step 2: Make one the other way in black.

3

Step 3: Leave as is if you like!

4

Step 4: Or continue alternating stripes and colors.

5

Step 5: With two colors it creates an arrow effect.

6

Step 6: If you alternate stripes with a third color it looks like a plait. Cute in Halloween colors but not scary! Enjoy your cute nails.

7

That’s it. As you can see, this nail art is very suitable for Gothic Lolita coords as well as sweet Lolita coords. If you are a gothic Lolita or sweet Lolita, why not practice now? As always, if you have problems or suggestions regarding to this tutorial, please feel free to let me know, I will get back to as soon as possible.

Lolita Makeup Tutorial: Sugar Icicle Lips Tutorial

Step 1: Start with clean moisturized lips.

1

Step 2: Apply a clear or nude sticky lipgloss.

2

Step 3: Make sure it’s an even coat.

3

Step 4: Prepare a small bowl and fill with sugar.

4

Step 5: Dip your lips in. The sugar will crystalise in place.

5

Step 6: Brush off an excess with a make up brush and complete your photoshoot as quickly as possible.

6

That’s it, very interesting, easy and funny, right?

7

As always, if you have any problems or suggestions regarding to this tutorial, please feel free to leave a comment below and I will get back to you as soon as possible.

Lolita Makeup Tutorial: How to Do Rose Print Nail Art

Step 1: Apply a light purple as a base color.

1

Step 2: Next apply pink splotches randomly on the nail. Include some double roses eg. Two spotches touching.

2

Step 3: For leaves, add small triangles in a pastel green.

3

Step 4: Randomly add leaves to each rose. Double leaves look great too.

4

Step 5: To turn the splotches into roses, use white to draw a “C” shape in the center.

5

Step 6: Add more “C” shapes further out in the splotch.

6

Step 7: it really doesn’t have to be neat! Also add a small spot to the leaves as a highlight.

7

Step 8: Once it’s all dry finish off with a coat of clear polish.

8

That’s it. As you can see, you can finish it through 8 simple steps. However, if you still have problems or suggestions regarding to this tutorial, please feel free to leave a comment below. I will get back to you as soon as possible.

Lolita Tutorial – Basic Sock Topper Sewing Tutorial

A beautiful and well-made sock topper will surely make you look more kawaii, elegant and beautiful. You may saw some sock toppers through some online Lolita store but it’s just a simple accessory, I personally think you don’t have to buy it while you can easily make one on your own ^_^ Through this tutorial, I will teach you how to hand sew sock topper step by step.

Step 1: You will need 3 types of lace.

1

Step 2: Measure strips 2.5 times the way around you knee.

2

Step 3: To make it tall enough I used 4 pieces: 1): Eyelet for the top; 2) Basic lace; 3) Basic lace; 4)Edging for the bottom

3

Step 4: Laid out they form one large piece.

4

Step 5: Stitch them all together

5

Step 6:This is the result

6

Step 7: Fold the ends over twice and stitch it in place.

7

Step 8: Cut a long piece of ribbon

8

Step 9: Tie the end to a bobby pin

9

Step 10: Thread the bobby pin through the eyelet lace.

10

Step 11: Pull the ribbon tight so it ruffles the lace

11

Step 12: Done

12

Step 13: Use the ribbon to tie around the top of your socks!

13

At last, thanks so much for reading this tutorial. As always, if you have any problem or suggestion regarding to this tutorial, please feel free to leave a comment below and I will get back to you as soon as possible.

How to make Ruffles to Put On a Lolita Outfiut!

1

Step 1: pictures you will need reference of what type of ruffles you want to accomplish. This is what I call the medium type not the extreme but just enough.

2

Step 2: This is basic of tools of making ruffles well this is what I use to make them. You will need scissors, thread, seam ripper, seam gauge, pins, pencil and a tape measure.

3

Step 3: On my sewing machine it has a button in which you can change the length of the thread so I had put mine on the biggest bar.

4

Step 4: I used a piece of scrap fabric to make a test ruffle but first thing is first you MUST measure the length of the fabric and the length of the garment you are going to be placing the ruffle on. Double it because when you start pulling your threads its going to get smaller and smaller so its much easier to make it longer then find out that its half the size that you need it to be.

5

Step 5: Mark your fabric with a pencil or chalk whatever you prefer, I usually use a coloring pencil. Mark how long and how wide you want the whole ruffle to be I did a 6 by 6 measurement.

6

Step 6: Cut your fabric following the line that you marked. I had cut my a little crooked but that’s OK it won’t really make a difference in the end.

7

Step 7: Starting at 5/8 of an inch I sewed straight down. Now make sure that you have your stitch length at the longest setting if you don’t have to take out the small stitches and start over again.

8

When you get to the end make sure you give yourself enough thread to pull. Then you can repeat the step again.

*Still Step 7*

See this is the line you will end up with now do it again next to it. See the red drawn on line that is how much you should have them apart.

9

Step 8: Now that you have both of your threads together to pull very gently then you will see ruffles starting to form.

10

Step 9: pull, pull and keep on pulling until you have you’re the amount that you want.

11

Step 10: Now you have tons and tons of awesome ruffles! Now I will show you how to toe them off.

12

Step 11: going back to your stitch length pull it so its almost the smallest. So you can back tack on the line of the ruffle.

13

14

Questions or comments? Or need help understanding what I wrote XXD If so, please feel free to leave your comment below and I will get back to you as soon as possible.

Advertisement: Want to shop affordable but top quality Lolita items? Please take a look at our online store: My-Lolita-Dress.com

Lolita Handsewing Tutorial: Sila’s Lacy Bracelet Tutorial

What You’ll Need:

  1. Broad base ribbon, needs to go around your wrist +3cm
  2. Slim lacy ribbons
  3. Broader lace ribbons + 2 types of really slim plain ribbons
  4. Beas or anything shiny you want to add
  5. Needle and threads
  6. Scissors
  7. Pins

0

Step 1: Cut the 2 lacy ribbons into 2 pieces each – the same length as the base ribbon.

1

Step 2: Make a bow out of one type of slim ribbon.

2

Step 3: Cut four even pieces of the 2nd slim ribbon +/-25cm.

3

Step 4: Fold 1.5cm on each side of your base ribbon, not to leave shredded ends.

4

Step 5: Add both lace ribbons to the sides of the base one, secure them with a few pins and placed the slim one over the broader.

5

Step 6: Next carefully sew the 3 together, gradually removing the pins. Tie triple knots on the end of the thread before cutting it off.

6

Step 7: Do the same with the other side of the bracelet and the 2 remaining lacy ribbons.

7

Step 8: Now you must sew on the 4 thin ribbons to both ends of the bracelet. These will be used to tie it on your wrist so make the fairly long.

8

Step 9: Add the purple bow and any additional ornaments. And chose a Swarovski heart and black sequins.

9

10

That’s it. It is very simple, right? If you have problem regarding to this tutorial, please feel free to leave a comment below and I will get back to you as soon as possible.

Advertisements: Beautiful Lolita Bracelets >>>>>>

1. Attractive Black Lace Retro Lolita Bracelet Lolita Bracelet

QQ

2. Charm Light Pink Wide Lace Bracelet

QQ2

3. Fabulous Black Lace Retro Lolita Bracelet

QQ3

Lolita Handsewing Tutorial: How to Make Ruffled Choker On Your Own

Lolita choker is not a necessary part of Lolita coordinate but I always believe that an adorable Lolita choker will make you more kawaii, elegant and beautiful. So today, I will show you how to make ruffled choker. It is very easy, I believe you can easily finish making your own ruffled choker on your own after reading this tutorial. OK, I guess you are ready, so let’s start!

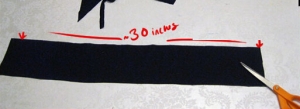
Step 1: Measure your neck, rake that measurement and multiply it by two. Cut out a rectangular piece of fabric twice the circumstance of your neck and twice the width you want your choker. Mine was 30 in ling and 5 inches wide, taking into consideration 0.5” seam allowance.

1

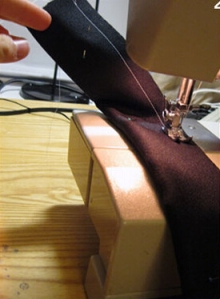
Step 2: Fold it in half length wise and sew the raw edges together, with half inch seam allowance.

2

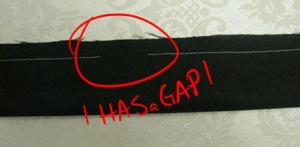
Step 3: Be sure you leave a gap to be able to turn it.

3

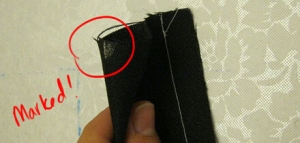
Step 4: Mark the folded over part opposite to the seam you just sewed together

4

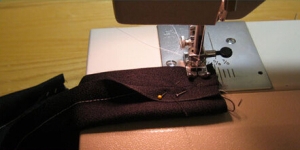
Step 5: Sew both ends together

5

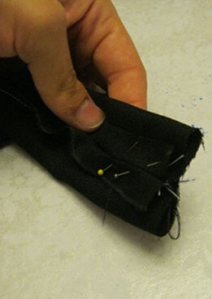
Step 6: Match that mark to the seam on both ends, pin them together.

6

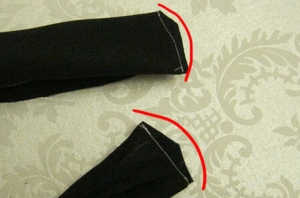
Step 7: Clean up the corners to rounded ends.

7

Step 8: Turn it inside out and iron it.

8

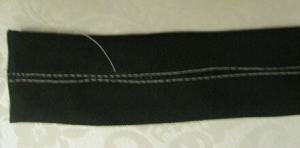
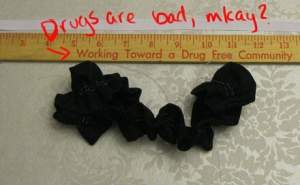
Step 9: Stitch two gathering seams down the middle, in other words stitch the longest length stitch.

9

Step 10: Gather the black ruffles to the desired length, mine is 14.5”, cut whatever you want to use for the middle, I just used some white ribbon I had, 4 inches longer than your desired length.

10

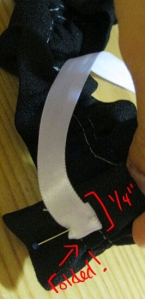
Step 11: Fold in 1/4” of ribbon then pin about an inch of it on the wrong side.

11

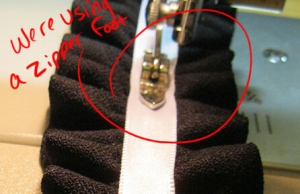
Step 12: Stitch down one side of the ribbon, I used my zipper foot because I find it easier. Leave two and a half of the center without ruffles, this will serve to fasten.

12

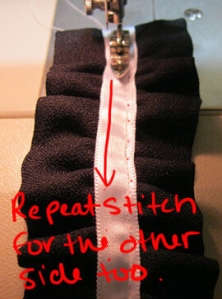
Step 13: Repeat stitch for the other side too.

13

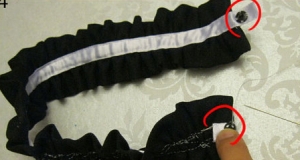
Step 14: Attach fasteners on both ends as shown
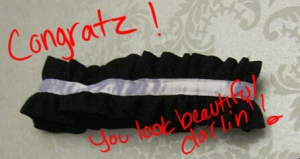
14

You are done!!!

15

I did this very quickly and used scraps. What? It is difficult for you? NO no NO NO no~~~ As always, any problem, feel free to leave a comment below and I will get back to you as soon as possible.

Lolita Tutorial: Lolita Style Pointed Sleeves

You may want have seen these kinds of sleeves before and wondered how to make them. I figured out how and because I am a nice girl I’m willing to share.

1

This is the basic pattern – a square:

2

Now, I am sorry this is going to be a bit mathematical but once you have figured it out it shouldn’t be difficult, I promise J All length in cm.

First of all you need the radius [r]. Measure the width of your wrist or wherever the sleeve is supposed to start (for stretch fabric). For non-stretch fabric measure the widest part of your hand – about where the thumb is. This is [C].

So r = 4 X C / 6.3 (e.g. C=20 => 4 X 20 / 6.3 = 12.7)

Now, decide how long you want the pointed part to be (from your wrist or other chosen point). This is going to be [L].


After that it’s really easy to figure out how long [a] is supposed to be:

a = (r+l) / 1.4

Once you’ve calculated all lengths draw the patter on a piece of paper and cut it out. Cut away the quarter circle, too (but that’s obvious). This is where it will be sewn to the rest of the sleeve. The yellow lines indicate where to close the sleeve.

If you want a second layer like the one in the picture simply cut out the patter twice and make cuts parallel to the left and bottom side (e.g.: 3cm wide).

Lolita Tutorial: Plaited Bow Headband Hair Tutorial

1. Start with brushed hair.

1

2. Section a piece above your ear.

2

3. Clip to the side.

3

4. Plait a small piece under it and behind your ear.

4    4-1

5. Repeat on the other side but higher up.

5

6. Bring the lower plait over your head like a headband.

6

7. Pin in place.

7

8. Loop the higher plait.

8

9. Loop it into a figure 8 with the end pointed down.

9

10. Pin and cover the middle with a flower.

10

11. Unclip the rest of your hair.

11

12. The two sides are different but pretty.

12

13. Done!

13

Advertisements >>>>>>

1. Classical Puppets Steam Band Couple Lolita Wig

QQ1

2. 5 Colors Rainbow Bobo 35cm Short Lolita Wig

QQ2

3. 35cm Short Brown Green Lolita Wig

QQ3

Lolita Hairstyle Tutorial – Bow Style Hairstyle Tutorial

1. Make a high ponytail

1

2. Pull a small section forward.

2

3. Clip out of the way.

3

4. Put an elastic around the end of the rest of the ponytail but don’t completely pull through on the last round.

4

5. Like this.

5

6. Fold back and pin in place.

6

6-1

7. Split the top in half.

7

8. Pin the dangling bit in front of the elastic.

8

9. Pull it backwards.

9

10. Pin at the back.

10

11. Tease the tail

11

12. Stuff it up inside the bow loops.

12


12-1

13. Add a bow at the back if you like.

13

14. Done!

14 14-1

That’s it. As usual, if you have problems or suggestions, please feel free to leave your comment below, I will get back to you as soon as possible. 

Credits to voiletlebeaux.com


Advertisements >>>>>>

1. 65cm Purple Green Curls Lolita Wig

QQ1

2. AMO 70cm Lavender Pink Curls Lolita Wig

QQ2

3. Sweet Brown Face Framing Short Bobo Wig 2 Ponytails

QQ3